
TimeFlow Intervalometer for Beaulieu
This is the online manual for the TIV-300Bl, the TimeFlow model for the Beaulieu.
At times, It refers to the TIV-200 model. This is an earlier model that was replaced by the TIV-145.
Introduction
Congratulations on your purchase of a TimeFlow Intervalometer (TIV)!
On the outside, your TIV has a durable powder-coat finish, snap-action pushbutton, and two rugged thumbwheel switches.
On the inside, your TIV uses the latest in surface-mount and microprocessor technology. The end result of nearly three years of development, your TIV is a rugged, dependable accessory that will allow you to create compelling time lapse footage.
It is suggested that you read this entire document before using your TimeFlow™ Intervalometer. The best way to familiarize yourself with the controls and operation of the TIV is to experiment with it while it is not attached to your camera.
This document contains instructions for the use of the TIV models 200 and 300 for the Beaulieu camera.
Controls and Indicators
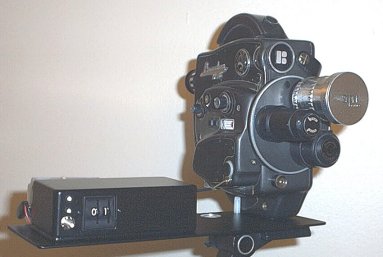
The base plate has a 3/8" hole at one end. It is held between camera and tripod by this hole. The pushrod sticks out the front of the control box . The pushrod is threaded into the actuator, which is not visible. If you gently push and pull on the pushrod you can hear the gears of the actuator whir.
On one side of the control box are the two thumbwheels, the idle light (green), the run light (red), and the run/idle pushbutton.
On the other side is the 4AA battery pack. Do not connect a 9V battery to the battery pack snap or your TIV will be transformed into a fancy paperweight. Do not use a plug-in wall transformer either, as these can have higher voltages then indicated, and can damage the TIV. A set of batteries will last for months of filming.
There is an on-off switch as well. Up is on.
Installation
The base plate of the TIV is held between camera and tripod. The guidepost holds it in proper alignment. The TIV points at right angles to the camera, and the pushrod goes into the single-frame release on the side of the Beaulieu.
To install the TIV to your camera, remove the head from the tripod. Turn the camera over. Turn the TIV over and align the 3/8" hole in the base plate with the threaded hole in the bottom of the camera.
Screw them together with the tripod head. Now you can mount the assembly on top of your tripod.
The Pushrod
Adjusting the Pushrod
The length of the pushrod must be adjusted for your camera. There is a threaded fitting that attaches the pushrod to the actuator. This is hidden inside the control box and can be seen if you gently pull the pushrod.
You will hear the whirring of gears inside the actuator. There are many small nylon gears, so be gentle.
The pushrod can be screwed in and out of this threaded fitting to adjust its length.
If the pushrod can't be made short enough by screwing it into the pushrod coupling, it can easily be trimmed with a pair of pliers.
To adjust the length, install the TIV and wind the camera.
Set the thumbwheels to 00 and apply power. The lights will flash in an alternating pattern, indicating that the TIV is in the manual triggering mode. Each time you press the pushbutton the pushrod will pulse outward, then return to the neutral position.
Press the pushbutton.
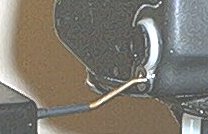
Fit the pushrod into the single-frame release hole on the Beaulieu and adjust the length until it is touching the single-frame release.
Press the pushbutton. Was a frame exposed?
If not, you'll probably have to make the pushrod a bit longer, or change the pushrod throw as described in the next section.
For a final test, change the thumbwheel setting to 01. Press and release the pushbutton, and the TIV will start exposing frames, one per second. To stop, press and hold the pushbutton until both lights come on, then release.
Changing the thumbwheel setting away from 00 takes the TIV out of manual triggering mode places it into idle mode. To change back to manual triggering mode turn the thumbwheels to 00.
Changing the Pushrod Throw
The throw of the pushrod, i.e. how far it moves out when triggering a frame, can be changed.
There is a timing values that controls the pushrod throw (how far it moves out when triggering a frame). This value is called throw. You can change the value of throw. Larger numbers make the pushrod move further out. Throw is set to 10 units when the TIV comes from the factory.
Ideally, you want the smallest value of throw that will reliably expose a frame.
To change throw, turn the thumbwheels to 59. Press the pushbutton. Both lights will start flashing. Turn the thumbwheels to the desired value of throw (in the range of 1 to 20) and press the pushbutton. To cancel, just leave the thumbwheels at 59 and press the pushbutton
The new value is stored in the TIVs permanent memory, and will be used from now on.
Filming with the TIV-200/300
The TIV-200/300 has two modes, idle and run.
When the TIV is in idle mode, no frames are exposed. In run mode, the single-frame release is triggered
Switching between these two modes is done by the Run/Idle pushbutton.
When power is first applied, the lights will flash and the TIV will go into idle mode. In idle mode, the idle light will flash every half-second. This is an indication that the TIV is working correctly and is ready to receive your input.
(Note that if the thumbwheels are set to 99 when power is applied, the TIV-300 will start filming using the contents of Preset 99. Refer to the information on presets toward the end of this document.)
The TIV allows you to program both the number of frames to expose (frames) as well as specify the interval between exposures (interval). (You can also burst for multiple frame exposures, but that is discussed later)
When power is applied to the TIV, frames is set to 20 seconds (480 frames of film).
To program frames, dial in the seconds of film you wish to expose on the thumbwheels. Refer to the chart at the end of this manual.
Then press and hold the pushbutton until both lights flash in an alternating pattern. Release the pushbutton. Frames is now set, and the TIV will return to idle mode.
If you hold down the pushbutton too long, you will program burst mode. That's the next topic.
To set the interval, refer to the interval chart. For example, if you would like one frame to be exposed every 5 seconds, turn the thumbwheels to 05. If you would like one frame to be exposed every 1 and 1/3 second, turn the thumbwheels to 62.
To start filming, press and release the pushbutton. The idle light will flash each time a frame is exposed. The run light will start flashing on and off.
After the programmed number of frames have been exposed, the TIV will automatically return to idle mode.
If you wish to stop the TIV before the programmed number of frames have been exposed, press and hold the pushbutton until both lights come on. Release the pushbutton and the TIV will return to idle mode.
Changing the setting on the thumbwheels while the TIV is filming will have no effect on the interval. You must press the pushbutton twice (going to idle mode, then back to run mode) to register the change.
Burst Mode
The TIV can be programmed to expose more then one frame at each interval. This is called burst mode, where burst can be from 2-10 frames (TIV-200) or 2-99 frames (TIV-300). The frames are exposed one after another at the fastest rate, which is 2/3 second for each exposure.
For example, a burst of 6 will expose six frames in four seconds, with a delay of interval between each set of exposures.
Turn the thumbwheels to 57 and press the pushbutton. Both lights will flash. Change the thumbwheels to the desired burst and press the pushbutton again..
Burst is now programmed. To turn off burst mode, program burst to one or fifty-seven (i.e., press the pushbutton twice after turning the thumbwheels to 57).
The value of 50 for burst has special consequences, discussed later in this document.
Time Delay Mode (TIV-200/300)
The TIV has a feature which allows you to set a delay before filming. The delay can be from 15 minutes to 1485 minutes (24 hours, 45 minutes).
To use this mode, first program frames and burst to the desired values.
Turn the thumbwheels to 50 and press the pushbutton. Both lights will start flashing. Change the thumbwheels to the number of 15 minute increments you wish to delay.
For example, for a one hour delay, turn the thumbwheels to 04. For a 20 hour delay, turn the thumbwheels to 80.
Press and release the pushbutton. The lights will flash in a slower alternating pattern. This indicates that the timer is running. You can now turn the thumbwheels to the desired interval.
Whatever interval is set on the thumbwheels at the end of the delay is the interval that will be used for filming.
To exit from delay mode, press and hold the pushbutton until both lights come on. Release the pushbutton and the TIV will be back in idle mode.
Another way to program Interval (TIV-300 only)
There is another way to tell the TIV the interval you wish to use. This method is useful when you are programming the TIVs presets (next topic). It also allows for intervals of up to 99 minutes to be entered.
To program interval in seconds, turn the thumbwheels to 52. Press and release the pushbutton. Then, turn the thumbwheels to the desired interval, and press and release the pushbutton once more.
You can also program interval in 1/3 seconds increments or in minutes, by turning the thumbwheels to 51 or 53 respectively.
For example, if you turn the thumbwheels to 51, press the pushbutton, then turn the thumbwheels to 01 and press the pushbutton, interval will be 2/3 of a second. If you turn the thumbwheels to 02, interval will be 1 second, if you turn the thumbwheels to 03, then interval will be 1 and 1/3 second, etc.
To film with the interval you just entered in using this method, turn the thumbwheels to 90 and press the pushbutton.
Presets (TIV-300 only)
The TIV-300 has 10 memory locations. These locations store combinations of interval, frames, and burst values. These memory locations are referred to as presets.
You can program nine of these presets, accessed by thumbwheel settings of 91 to 99. Preset 90 is special, it stores the values used the last time the TIV was run.
Preset 90 is also updated with the values of interval and burst that you set using the special thumbwheel settings between 51-57, and with the value of frames you set by pressing and holding the pushbutton.
To program a Preset with the current settings of interval, frames, and burst, first turn the thumbwheels to the desired Preset number (between 91 and 99). Then, press and hold the pushbutton until both lights flash. Release, and the settings are programmed.
To use one of the Presets, turn the thumbwheels to the desired Preset. Press and release the pushbutton, and the TIV will flash the run light three times, and then start filming using the values in the Preset location.
This slight delay before filming allows you to read the contents of the Preset into interval, frames, and burst without actually exposing any frames. You then can change any one of these values, and then film with the new setting, or program it back into a Preset.
Note: there will not be this delay when using Preset 90.
If you try to use a Preset where you haven't stored anything, the run light will flash once and the TIV will return to idle mode. Burst will be reset to 1, and frames will be reset to 480.
Automatic Running using Preset 99
If you set the thumbwheels to 99 and apply power to the TIV-300, it will start running using the contents of this Preset. This can be useful when you have your TIV hooked up to a power source controlled by a timer or switch of some kind.
Automatic Filming of Multiple Presets
The TIV-300 has a useful feature that allows you to tell it to film using the contents of multiple Presets, one after the other. This is called chaining.
For example, let us say Preset 91 contains an interval setting of 1 second and a frames setting of 120 (10 seconds of film). Preset 92 contains an interval setting of 5 seconds and a frames setting of 60 (5 seconds of film). To chain from Preset 91 to Preset 92, so that first 10 seconds of film are exposed with an interval of 1 second, and then 5 seconds of film are exposed with an interval of 5 seconds, do the following.
Turn the thumbwheels to 91 and press and release the pushbutton. Quickly turn the thumbwheels to 92, before the final blink of the run light. Both lights will flash an additional six times, indicating that your chaining command was successful, and filming will commence.
You can chain from any Preset to any higher Preset, for example, 91 to 99, or 93 to 96, but not from a higher Preset to a lower Preset. Also, you cannot start chaining from Preset 90.
Although you must change the thumbwheels away from the first Preset before the third blink of the run light, the value used for the final Preset will be whatever is on the thumbwheels after the sixth blink of both lights (right before filming commences).
Canceling a Chaining Sequence
If you press the pushbutton while filming in a chaining sequence, the TIV will cancel the entire chain and return to idle mode. To finish with the current exposure sequence, but cancel pending exposure sequences, turn the thumbwheels to 00.
Delaying between Exposure Sequences
There are two ways to put a delay between chained exposure sequences. For example, let's say you would like to film 10 seconds of film with a 1 second interval, delay for two hours, and then film 10 seconds of film with a 4 second interval.
Program Preset 91 with a 1 second interval. Then program Preset 92 with frames equal to 6, and interval equal to 24 minutes. This will "delay" for 5 times 24 minutes, or exactly two hours, while a quarter-second of film is exposed. Finally, program Preset 93 with a 4 second interval.
Chain from Preset 91 to 93, and your two sequences will be filmed without any further effort on your part. Of course, a quarter-second of film will be wasted.
The second method is to use the special setting of 50 for burst. Right before the TIV starts filming using the values in a Preset, it checks the value of burst. If burst is equal to 50, the TIV doesn't film.
Instead, it uses the value stored in interval as a delay, according to the following formula. Delay (in minutes) is equal to interval (in seconds) times three.
So for example, if interval is set to 2/3 second, the TIV will do nothing (other then flash its lights) for two minutes. If interval is set to 10 minutes, the TIV will delay 600 times 3 (1800) minutes, or 30 hours.
(If you do not start filming using one of the Presets, and you have programmed burst to 50, the TIV will film normally, re-setting burst to 1.)
Using Presets to delay, you could conceivably shoot 5 different sequences with 4 different delay times in between.
Conclusion
Film, experiment, and let us know if you have any problems, or any suggestions for improvement.
| Chart for specifying Interval |
|
| Thumbwheel Setting |
Interval Between Exposures |
| 1-49 |
1 to 49 seconds in 1 seconds increments |
| 60-70 |
2/3 second to 4 seconds in 1/3 second increments |
| 71-89 |
1 to 19 minutes in 1 minute increments |
| Chart for specifying Exposures |
|
| Thumbwheel Setting |
Exposures |
| 1-88 |
1 to 88 seconds |
| 89 |
256 seconds (4 minutes, 16 seconds) |
______________
OUR PRODUCTS
TimeFlow
Intervalometers
> for Bolex
> for Beaulieu
> for K-3
> for Scoopic
Revolution Motors
Time Lapse + Sync
> for Arri
> for Bolex
> for Eyemo
> for Mitchell
> for Other
______________
Prices+Ordering
Film Time Lapse
Digital Time Lapse
_______________
OTHER NCS
WEBSITES
> Arri
> Bolex
> Eyemo/Filmo
> Film Resources
> Krasnogorsk-3